Subscribe
"Unlock exclusive insights and elevate your financial wisdom with NetWorth.com — subscribe now to stay ahead in the wealth game!"
This article will walk you through the steps to convert a JPG file to PDF in popular OS. You may be asking yourself “Why would I want to do that?” Well, there are many reasons why someone would want this conversion. For example, you may need a high-resolution version of your document for printing purposes or to send it over email without having it pixelated and unreadable. The process is fairly simple and can be completed in just minutes!
There are a multitude of reasons why someone may want to convert their JPG file into PDF. The most common reason is that you need your document in high-resolution for printing or emailing purposes without it being pixelated and unreadable. Another example would be if the person wanted to edit an image contained within a page, like adding a picture of their family to a wedding invitation.
>> Start your FREE trial with Adobe for an easy way to convert a JPG to PDF.
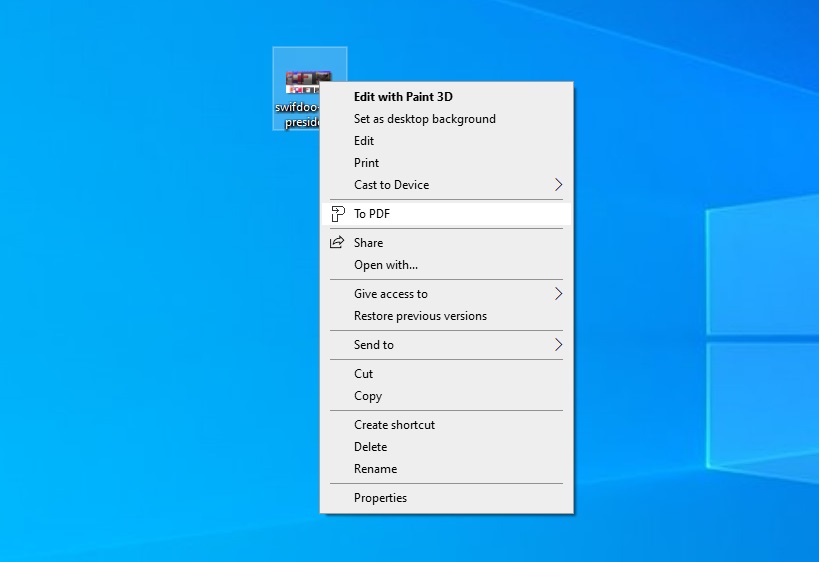
To convert JPEG to PDF via SwifDoo, download it from the official website and install it. Once installed, follow the simple steps as mentioned.
Step #1 – Right-click on the desired image file and select “To PDF” as shown in the screenshot and click.

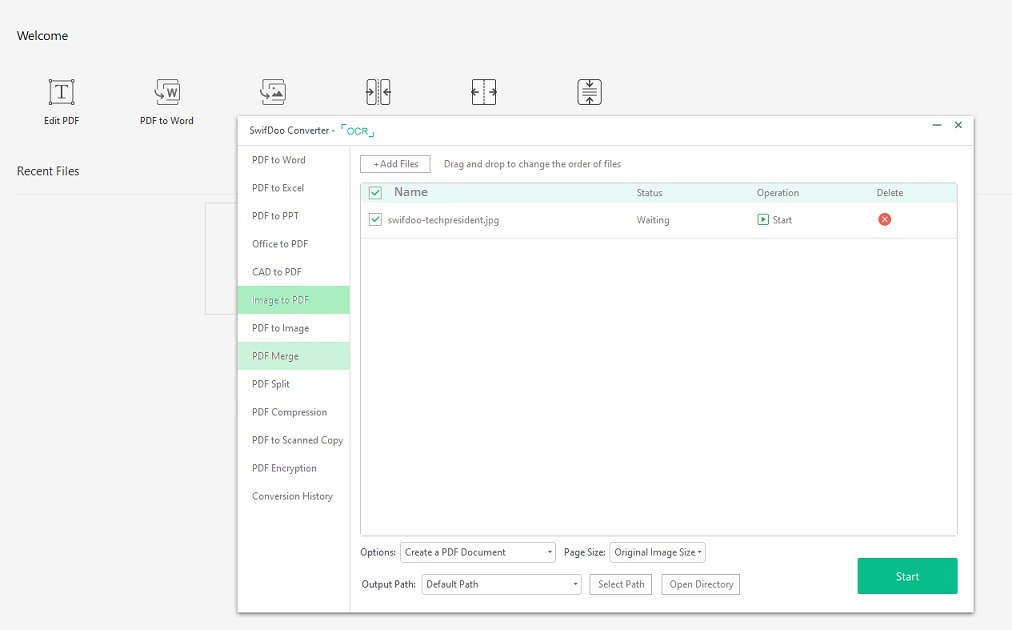
Step #2 – You will be required to click on the “Start” button for the conversion process to start.

Step #3 – In this step, you just need to save the file at your desired location and you’re done.
With SwifDoo, you can easily add images to PDF documents. Please make sure you download it from the official website (https://swifdoo.com) to avoid malware.
The process is very simple and can be completed in minutes. To convert a JPG file to PDF, you will need Adobe Acrobat or the free version of Adobe Reader.
Step #1: Open up your document
Open up your document by double-clicking on it from Finder (or Windows Explorer) or selecting “Open” if you are using Adobe Reader.
Step #2: Select “Save As” from the File menu
Select “Save As” from the File menu.
Step #3: Choose a file type and name for your PDF document
Choose a file type and name for your PDF document by clicking on the drop-down menus that correspond to those options. You can choose either of these or both if you want different versions of the same document, as one with pictures included in it (PDF with images) as well as just text (PDF without Images). In this example, we will be choosing ‘PDF’, which is an abbreviation for Portable Document Format. Click Save when finished naming your new converted JPG-to-PDF file! Congratulations! Your file has been converted from JPG to PDF!
CONVERT FROM JPG –> PDF ON MAC NOW
The steps to convert JPEGs in macOS are similar, but the process is slightly different than on Windows. To start, open Finder and navigate to where you would like your new PDF file saved. Next, right-click or Control+Click* on your JPG image and select “Export” from the dropdown menu that appears under Options (or File).
This will launch a dialog box with two options: Image as PDF (.pdf) which preserves all of your photo’s original formatting and Text document as PDF (.pdf), which does not include any photographs within it for easier reading. Choose whichever option best suits your needs before clicking Save.
Open the Nautilus file browser and navigate to where you would like your new PDF file saved. Right-click or Control+Click* on the JPG image and select “Convert to PDF” from the dropdown menu that appears under File.
This will launch a dialog box with three options: Image as PDF (.pdf), which preserves all of your photo’s original formatting, Text document as PDF (.pdf), which does not include any photographs within it for easier reading and Image as JPEG (.jpg). Choose whichever option best suits your needs before clicking Convert.
Step #1 – First, make sure that the photos are saved to your camera roll.
Step #2 – Open the Photos app and select the picture you want to convert. The photo will open in a new window, showing the picture with all editing features available for use.
Step #3 – Tap on Edit in the upper left-hand corner of the screen. This will give you access to more options such as cropping and rotating your images before converting them to PDF file format.”
Steps to convert JPG files to PDF in Android without an app:
Step #1 – Open the Photos App on your Android phone and find a JPG file you want to convert;
Step #2 – Click “Share”;
Step #3 – Select “Save as PDF” from the three options;
Step #4 – Enter a filename and location where you want to save it.
Q: Why would I want to convert a JPG file into PDF?
A: There are many reasons why someone may want to. The most common is that you need the document in high-resolution for printing or emailing purposes without it being pixelated and unreadable. Another example is if they wanted to include an image contained within the page, like adding a picture of their family on a wedding invitation.
Q: What do I need in order to convert my JPG file into PDF?
A: All you will need is Adobe Acrobat or Adobe Reader (free version) installed on your computer!
Q: What are the benefits of converting my JPG files into PDF?
A: There are many great benefits that come along with conversion. The most common benefit would be that the document is high-resolution and therefore easy to print or email without being pixelated and unreadable. Another benefit is that you can include images within the document, like a picture of your family on a wedding invitation card.
Q: What are some drawbacks to converting my JPG files into PDF?
A: There really aren’t any major drawbacks as long as there’s enough disk space available for storing documents in high resolution. The only real drawback would be that it takes up more storage than just text-only PDFs do because they need all sorts of different colors stored with them. However, this usually doesn’t become an issue unless you have hundreds if not thousands of pictures!